Source Section

This section provides the tools for entering a sequence of original lab-scale experiments describing the individual steps of your synthesis. There's no need to fit the scale of these individual experiments to match the scale of the next step - ChemProject will do this for you when calculating the campaign results. Therefore you can enter the material amounts 1:1 as specified in your original experiment protocol.
Materials Table
The unit operation materials table is the central part of the Source Data section, allowing the specification of all materials utilized in a unit operation. The basic procedure for entering materials is described in the Step By Step Guide and therefore will not be covered here.
The materials context menu, accessible by right-clicking a specific material, provides following functionalities:
- The Insert Material option inserts an empty materials row above the currently selected material. It is disabled if more than one material is selected.
- The Delete Material option allows to irreversibly remove one or multiple selected materials. Multiple materials can be selected via CTRL+click, or via SHIFT+click for continuous selections. Material selections containing a starting material or an intermediate can't be deleted.
- The Add to Price List option adds the currently selected material to the active price list, if not yet present. It is disabled if more than one material is selected, of if the material already is present in the price list.
- The Locate Material option graphically summarizes all occurrences of the selected material per synthetic branch in the Charts section. It is disabled if more than one material is selected.

In addition to the standard material properties, also additional ones like temporary cost reductions, volume type and disposal category are part of this table:
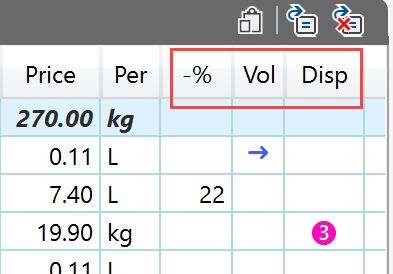
- Price Reduction ("-%"): This value describes a temporary material price reduction, as compared to the price in your current price list, as specified in the "price" column. It can be entered directly into the table and must be in the range between 1 and 99. Price reductions only should be applied when there's a temporary deviation from the usually applied material price, e.g. as stored in a common Price List, or for highlighting a special situation. Otherwise better update your material price list. When applying a price reduction to a specific material entry, you will be asked if you would like to apply the reduction also to all other occurrences of the same material (same name, same source) within the project.
- Volume Type ("Vol"): This read-only column contains symbols describing how the material volume is handled and reflects the the corresponding assignments made in the Material Detail panel. The possible types can be Transfer Volume, Exchange Volume, Exchange & Transfer Volume or no assignment. See Volume Handling for more details.
- Disposal Category ("Disp"): This read-only column contains symbols describing the material disposal categories and reflects the the corresponding assignments made in the Material Detail panel. Please refer to Disposal Assessment for more information on disposal categories.
The synthesis tree allows the navigation across all branches, steps and unit operations of a project. It features the two display modes below. Note stat the currently selected display mode is stored per project file, not application-wide.
- Default View (left): All steps are expanded by default to reveal the underlying operations. They can be collapsed manually, but will expand again when one of its contained operations is added, deleted, or selected in the operation sequence panel.
- Compact View (right): All steps are collapsed by default, but can be expanded manually. Adding, deleting, or selecting an operation from the operation sequence panel does not expand the parent step. This mode provides better overview in more complex projects.


Right-clicking an item in the synthesis tree accesses following item-specific context menus:

Branch Context Menu:
- Rename Branch: Activates the branch name title box (see Step Panel below) for editing.
- Copy Branch: Copies the branch into the clipboard. It can subsequently be pasted into another synthesis using the Paste Branch menu item.
- Paste Branch: Pastes a copied branch below the current one.
- Export Branch: Creates a new synthesis with the current branch as the main branch.
- Delete Branch: Deletes the current branch (disabled for the main branch).
- Insert First Step: Inserts a step before the first one of the current branch.
Step Context Menu:
- Rename Step: Activates the step name title box (see Step Panel below) for editing.
- Delete Step: Deletes the current step. Please note that deleting steps other than the first and the last one of a branch effectively creates a new 'telescoped' step context containing a different reaction. ChemProject supports you in adapting to the resulting new context:
|
Assume you can shorten (telescope) a synthesis from sequence A -> B -> C -> D to sequence A -> C -> D. After deleting step B -> C in your project, the newly formed step A -> C however still contains the now outdated original data of step A -> B. Therefore ChemProject removes all data of the original step A -> B to let you enter the materials and conditions of the new, telescoped step from scratch. Also its reaction sketch, if present, is automatically updated to contain the new product C. |
Operation Context Menu:
- Insert Op Before: Inserts an operation before the current one (disabled for the first unit operation).
- Delete Operation: Deletes the current operation (disabled for the first unit operation).
- Change Op Type: Displays a dialog allowing the assignment of a different unit operation type.
Step Panel

This area contains all step-related information. The header titles marked in red can be edited after a mouse click; press ESC. Enter or Return to finalize the changes. Clicking into the sketch area opens the integrated chemical drawing editor to allow changes to the current reaction sketch. Clicking anywhere inside the step summary area opens the step dialog for editing.
Unit Operation Panel

This area contains all unit operation and material related data. See the Step-By-Step Quick Guide for a description on how to enter data here. The top part contains a schematic workflow of the unit operation sequence present in the current step. Right-clicking a unit operation of the sequence opens a context menu providing options for inserting or deleting operations, or to change its type. The Next Op button at the end of the sequence adds a new unit operation.
The top right corner of the unit operation table contains buttons for following actions:
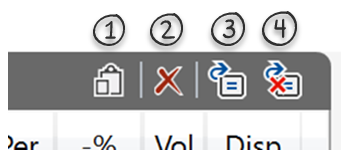
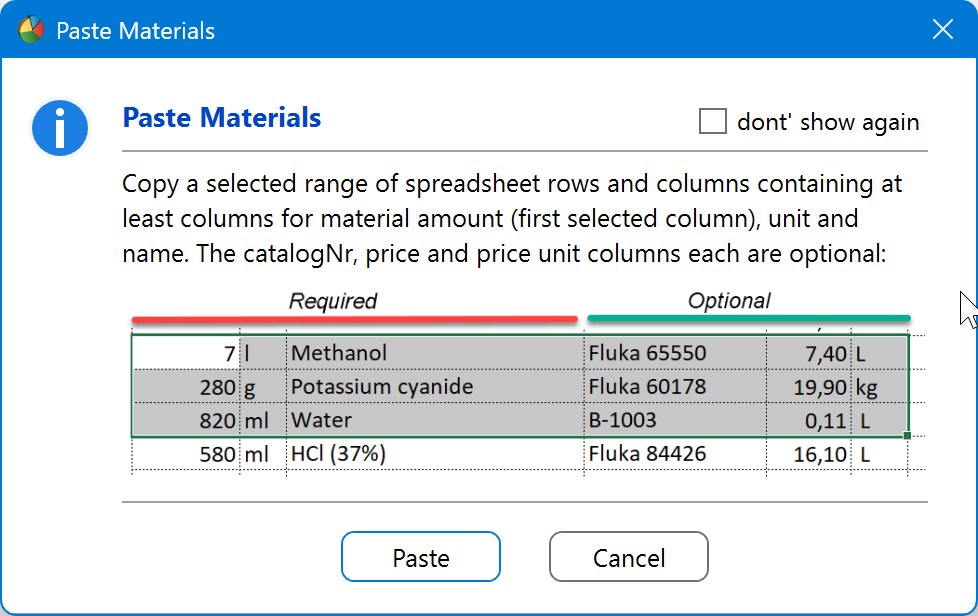
- ① Paste materials: Allows the import of materials from external sources by copying a spreadsheet (e.g. Excel) table selection. Copied materials are pasted below possibly already present materials. Material weight and volume equivalents (vq, wq) are accepted, however, molar equivalents (eq, mq) are not due to the missing molecular weight information.
- ② Delete Operation: Deletes the current unit operation. This button is not visible for the first unit operation, since this operation cannot be deleted due to the contained step starting material.
- ③ Transfer All Volumes: Specifies all materials of the current unit operation for volume transfer into the downstream unit operation. See Volume Handling for more information about volume options.
- ④ Clear All Volumes: Removes the transfer volume definitions of all materials of the current unit operation. See Volume Handling for more information about volume options.
Right-clicking a material in the materials table opens the material context menu offering following options:

- Insert Material: Inserts an empty row above the current material.
- Delete: Deletes the current material (disabled for the reference reactant).
- Add To Price List: Directly adds the current material to a price list. Only enabled if the material is not yet present in a price list (as determined by its 'source' descriptor, i.e. its catalogNr), and if it contains a source and price description.
- Locate material: Switches to the Locate Materials chart of the Chart Analysis section, displaying all occurrences of the current material within a branch in a 3D chart.
This panel, located to the right of the materials table, allows the assignment of additional material properties not listed in the materials table.

- Density, MW, Molarity: The specification of density, molecular weight and molarity is optional by default. However, a density is required for weight/volume conversions. A molecular weight or a molarity is required if a material amount is specified as equivalent.
- Transfer / Exchange Volume: Assigns the volume type of the material (see volume handling). If both items are checked, this is means a transfer & exchange volume.
- Imported From: This assigns the current material as an import from another branch, which effectively connects the branches. See connect branches for more details.
- Disposal Type: Assigns the material to a waste category, or displays waste group options if already assigned. See disposal assessment for more details.
- Material Comment: Allows the attachment a material comment; the text box enlarges when adding more text.

Specifying unit operation details is optional, you can leave this area, or parts of it, blank if you wish. However, when planning a synthesis campaign in more detail, this area allows the detailed specification of operating resources for the current unit operation. The input fields provide following functionality (from left to right):
- Costs/h: The overall operating costs per hour of the current unit operation, including manpower and infrastructure. Clicking the input box opens a dialog with two specification alternatives:
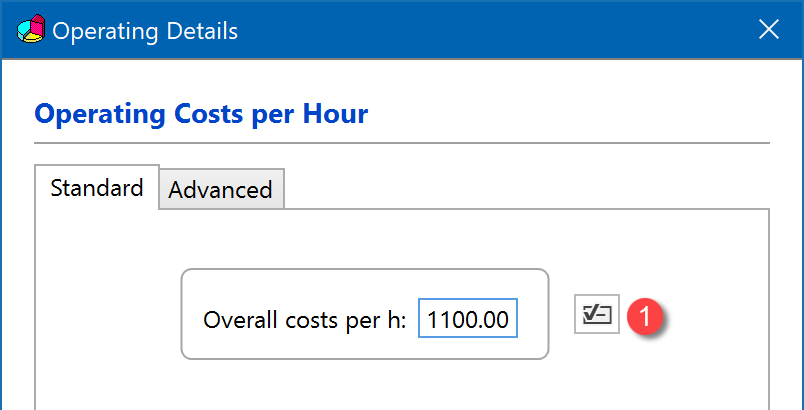

The Standard tab (left image), a simple overall value for operating costs per hour can be entered. The current value can be saved as default by clicking button (1). This default value will appear whenever no other value is specified. If can be reset to no default value by specifying the empty field as the default.
The Advanced tab (right image) allows a separation between operator and vessel costs per hour. Specify the number of required operators and the hourly costs of each in the 'Operators' box; both parameters must be specified to provide a valid input. The 'Reactor' box contains the hourly rental costs of the utilized equipment. It is also possible to specify Operators or Reactor costs only, if desired. The 'default' button (1) basically works the same as in the Standard tab. You can leave one, several or all fields blank when specifying the default values; the latter effectively clears the defaults. Default values only are filled in if none of the operating parameters were specified so far. Clicking the delete button (2) deletes all current entries at once.
Whenever detailed operating costs were specified in the Advanced tab, its source data appear on in the lower part of the Operation Panel: 
In the results report, the entered or resulting costs/h are multiplied by the specified operating time and the runs per step to provide the effective operating costs.
- Operating Time: The time required to run the unit operation (in hh:mm format).
- Runs/Step: Often the available equipment for a unit operation does not allow to hold the volume required by the campaign size, and therefore the step synthesis, or parts of it, needs to be split into multiple runs. In this case the default value of 1 per unit operation can be replaced by the actually required number of runs. You can utilize the Runs per Step Tool to determine the number of runs based on available limiting equipment volumes.
- Operator Count: The number of operators required to run the unit operation. The specified count only contributes to the operating costs if the operator costs per hour were specified in the 'Advanced' tab of the Operating Details dialog.

Observed Volume: ChemProject by default approximates operating volumes by adding up weights and volumes of all materials of a unit operation, also taking into account transfer and exchange volumes. If exact operation volume calculations are required, the observed lab scale minimum and maximum volumes of the unit operation can be entered into the min/max boxes. During campaign calculation, these volumes are automatically scaled to fit the required campaign amounts.